
Exploration project
Introduction
This game is one of my finest work. I made this game as part of my final project before obtaining my degree. I had about 3 months to design, program and build the game. I had to work cleverly to achieve the goal I intended to reach: solid level design. To achieve this goal, I created multiple sketches, beating documents and prototypes, trying as much as possible to follow professional workflows, with the help of my mentors.
Since I felt and ambitious and wanted to learn new skills, I challenged myself with creating a much more open game using a wide-linear layout. We have to see this project as a whole tutorial for an bigger open world game that would come after.
Role(s)
Level designer
Level artist (no modeling)
Game designer
Programmer
Artist and technical artist (Textures)
Sound designer
Year
2025 - 4th semester
Deadline
3 months
DEMO REEL
Level Design
The tutorial level
To make sure the scaling was good, I created references of my key components, such as my character height, and played the game almost as soon as I placed something to see how it fits in the world. I also used tools such as a blocking asset pack to create clear and detailed greybox.
Goal of this level
The tutorial is the first part of the game the player experiences. It is a linear path going trough a cave and was designed to tutorialize basic mecanics and movements to the player. This part of the game in cleverly lit by only using natural light from the sun and wholes in the ceiling.
Overall Design of the level
The level starts off as a linear path going trough a cave, but as the player continues it’s journey, the cave gets bigger requiring them to explore alternate paths in order to progress.
At this moment, I wanted to experiment with one of the common rule of level design : do not put your player in complete darkness. I made the next room extremely dark, and tried to guide the player only by using light cues. More on that lower.
Once they reach the final room of the cave, this one is completely open, giving the player the opportunity to explore and giving me the opportunity to teach them ‘‘open world’’ exploration in a smaller scale before revealing of the whole outside area.
This whole part is made to be simple, clear and teach the player how to play the game. But this goes further than controls and mechanics. I intended to teach them reflexes they’ll need to have while exploring and clearly explain the gameplay loop that awaits them.
Pacing was very important, that’s why during pre-production, I worked on a beating document. It indicates the target use, beating time and feeling I want to transmit of each sections of this level.
Sketch and beating of the level

Top-Down View
Final room
Key moments
of the tutorial level
(Section 2 in the skecth)
The dark area
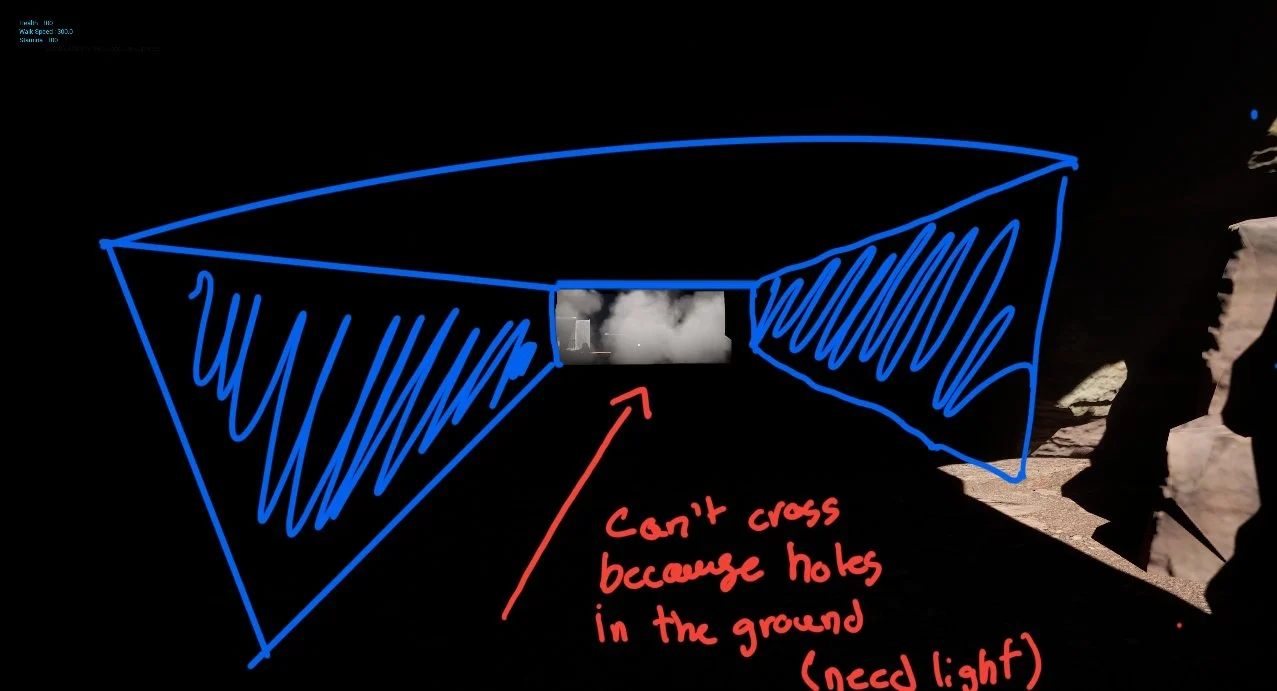
The main path is much more visible to trick player this is the next step, but in reality they need to get the flashlight first in order to see the dangers.
While working on this project, I had the intention of experimenting level design priciples. One of the most important rule is to never fully put the player in complete darkness. I pushed that rule as far as I could. When the player gets to this area, they can’t see anything but the wall in front of them. I then used the darkness as a design tool, using it in order to stop the player from progressing and instead use another path. Although this path is less obvious at first, the second time, players usually understand where to go next.
Left
The final room
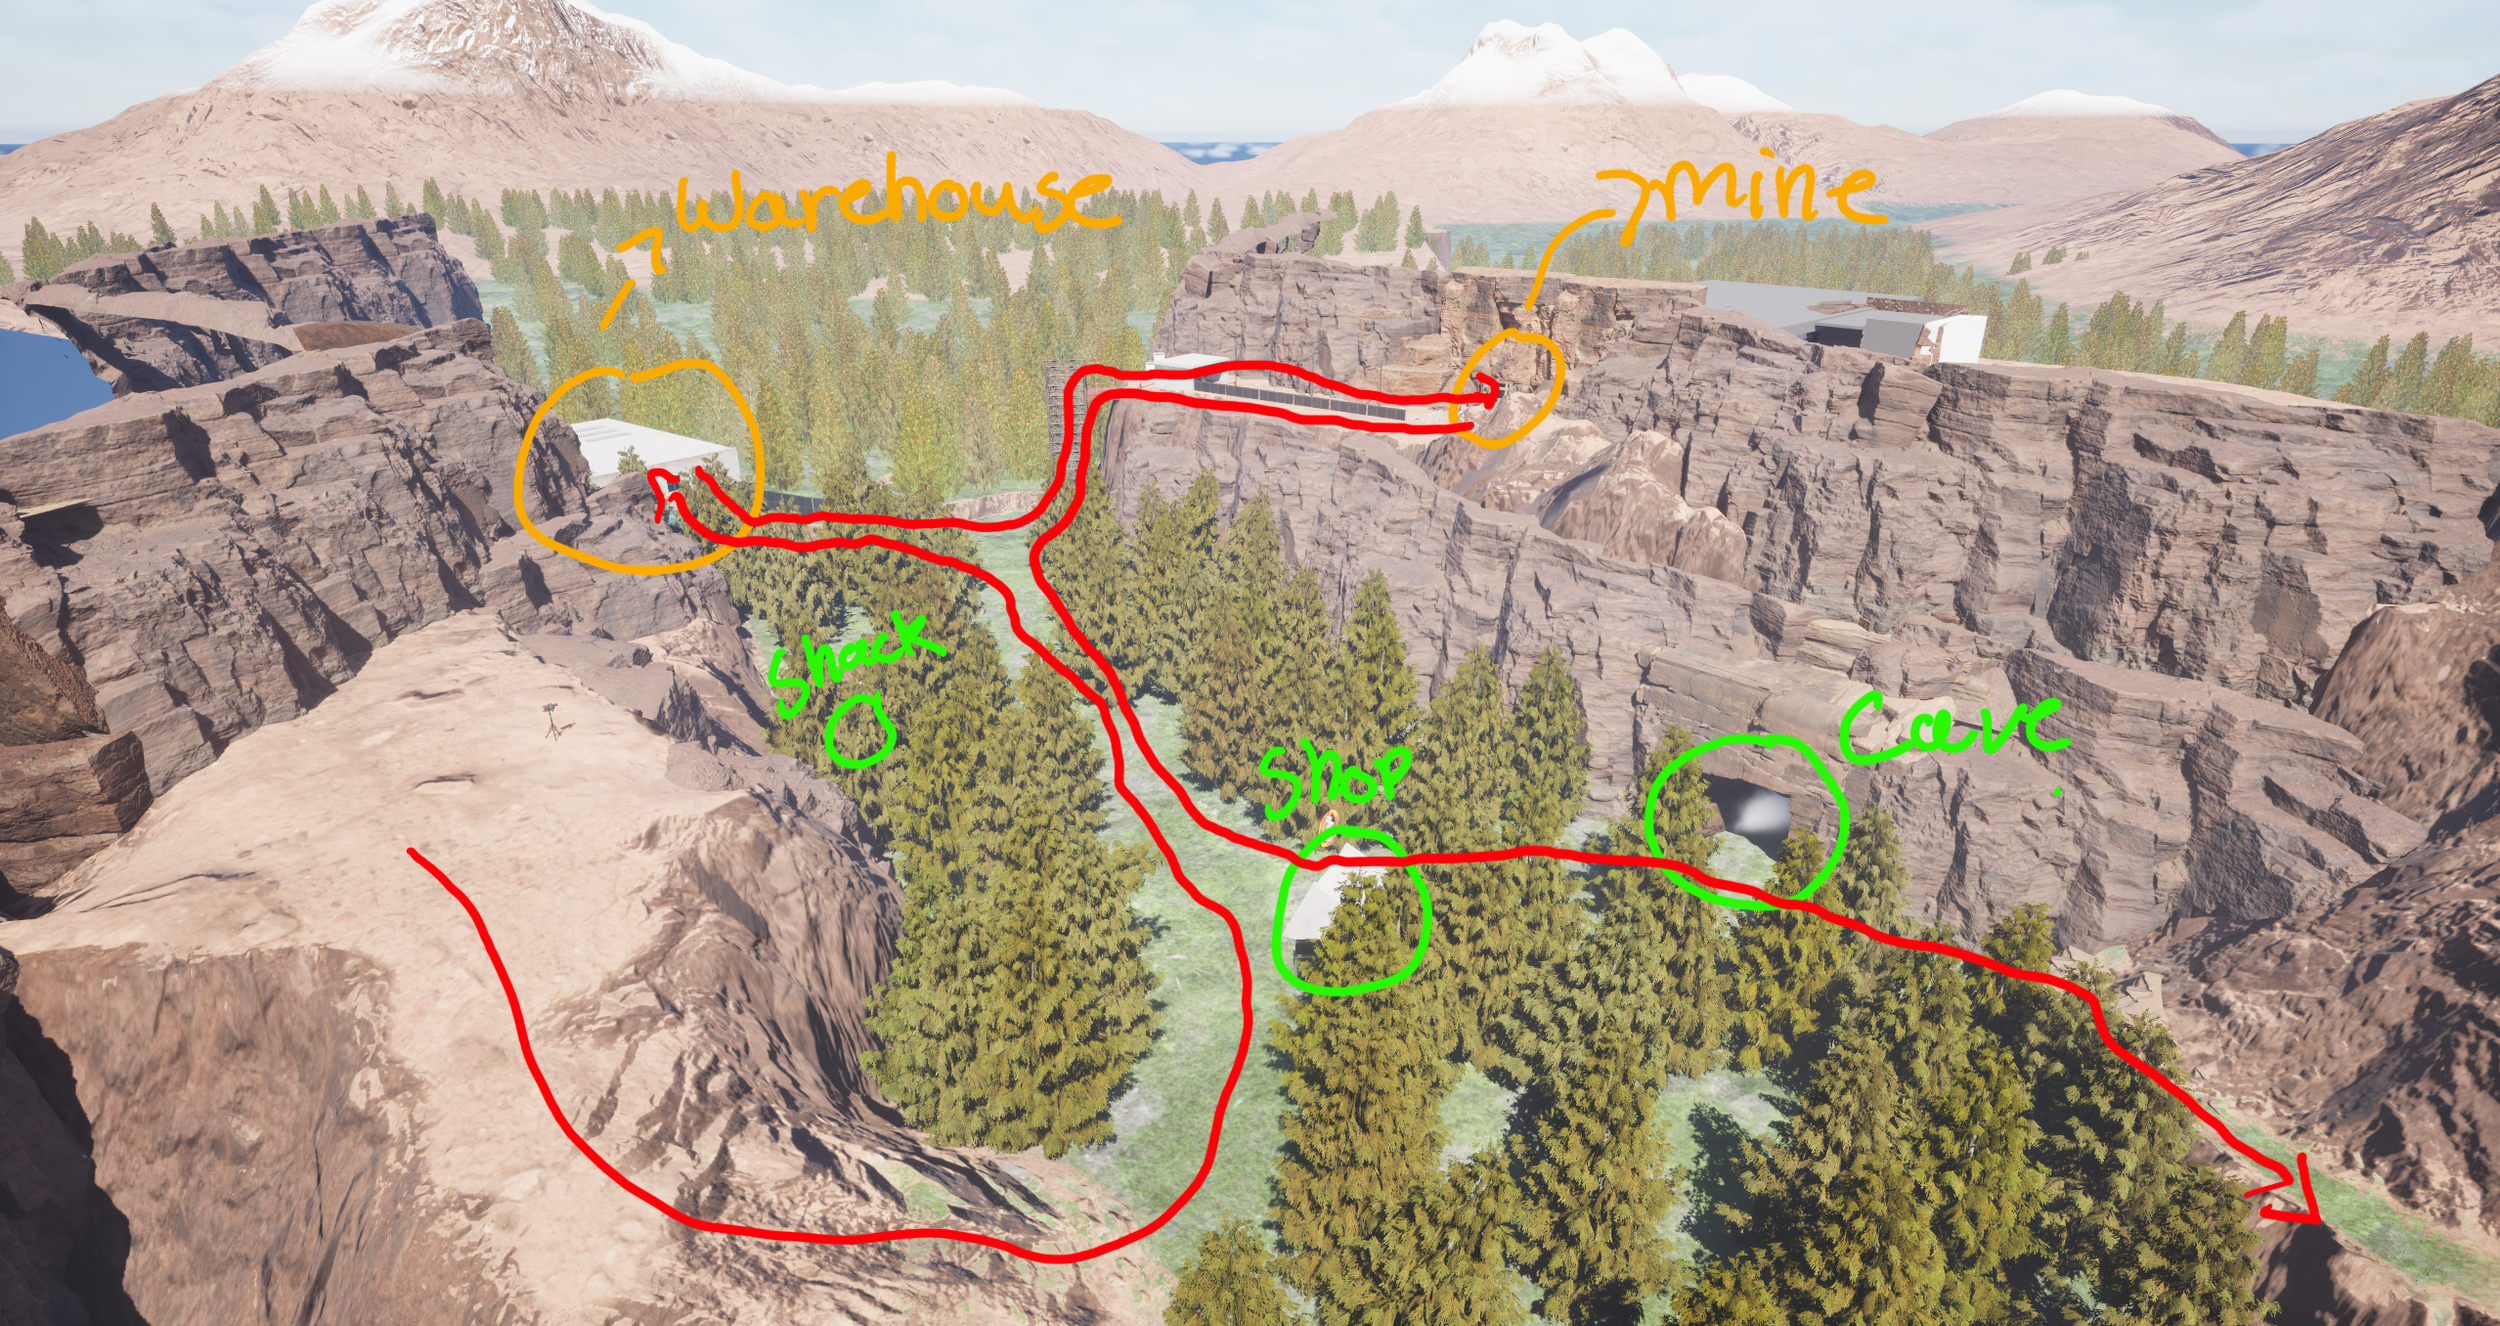
Red : Critical path
Green : Secondary Location
Orange : Main locations
Details
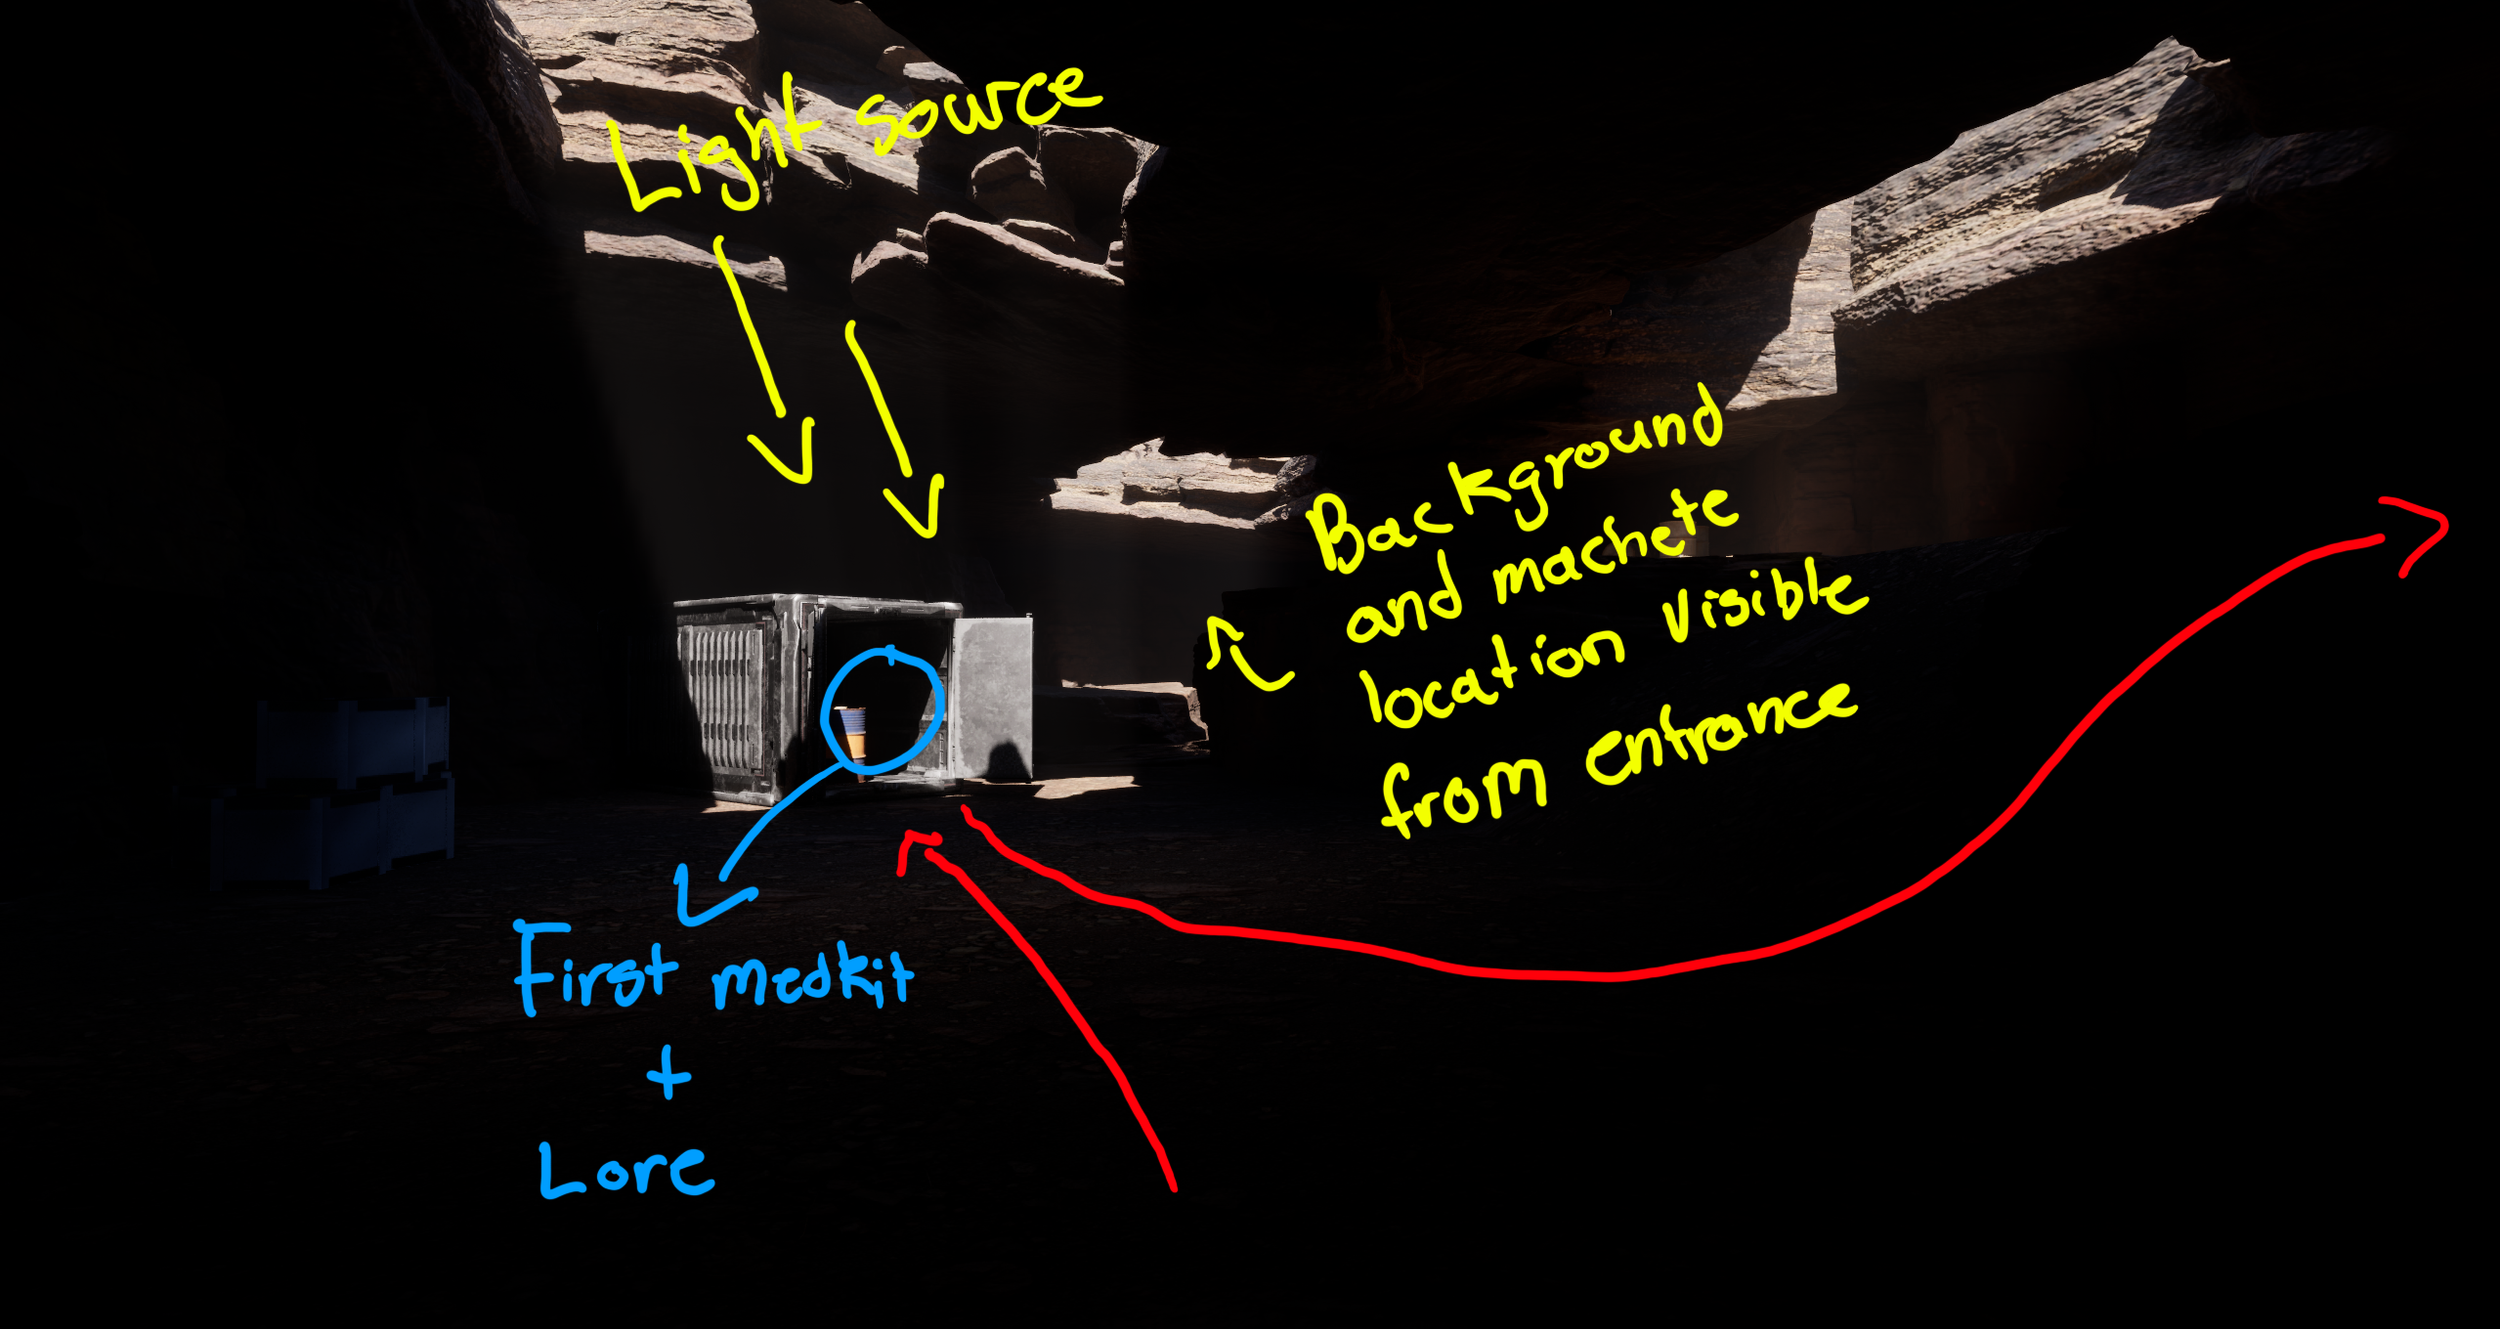
Red : Critical path
Blue : Items, tools, lore, etc,
Yellow : Environment annotation
These pictures allow to see how I designed this open area. Like the tutorial area, I sketched and went trough multiple iterations before finishing on this layout. I wanted to give a good sense of pacing and accomplishment.
The player has to visit all main areas to collect all 3 keycards to access the final area.
The critical path is optionnal, the player may go where ever they want at any time. This was a challenge because I had to make sure backtracking and exploration was interesting and fun for every possibility.
Entrance
Falling bridge
Details
Details
Front

This is the first thing the players sees when entering this part. The light is used as a reference for the player to understand which way they are looking. It is also directed at the main path.
Progressing with flashlight
(Section 3 in the skecth)
Right

This is where the player needs to go to find the flashlight. The goal is for the player to realise they need to go that way after one or two tries on the main path.
Top-Down view

The composition of this scene is made to give a sense of scale and send a message that the player will have to explore.
Light cues are also very obvious and the player can use their flashlight to travel between the POIs.
The container is the first thing the player encounters, that’s where they will be able to heal for the first time after going trought the toxic gas.
Entrance POV
This part has platforming, creating variation from walking.
It allows the player to get comfortable with the climbing and jump mechanics.
This section is mandatory in order to progress outside.

Other side POV
The player comes once, realise the exit is near, but needs the machete to get out.
Once they comeback with the machete, they can break the wood and leave!
The note is used as exposition. It also gives the general goal for the player and indications on how to exit the cave,
The wind sound is directional to help the player locate it.

Exit POV
This is the final room of the tutorial, it is much more opened. This space is meant to tutorialize exploration and give a small taste of the gameplay loop. To guide the player in this part, I mainly used light cues and sound cues for more important spots, increasing the player’s attention to those.

The world
Goal of this level
This is the main area of the game, what connects all of the area together. This is where to player is meant to explore and wander in order to find 2 more ojective keycards.
Overall View

When the player exit the tutorial area, this is the view that they are greeted with. The mine, the next logical destination, is clearly displayed right in front, also showing how to get to it: must take the elevator. The player can also see the shop, one of the most important POI to orient themselves and also the optional cave right behind. There is also a path that can be seen, showing the road ahead. In the matter of seconds, the player knows where to go and how to get to it. During my playtests, this has proven its efficacy and helped the playtesters create a mental map of the world.


Overall Design of the level
This level is much more opened, following a wide-linear layout. I used many different types of tricks in order to direct the player in the right direction. Since there is no map in the game, it was crucial to have solid level design and POIs that the player can use to orient themselves.
The level itself is connecting 3 main locations together: the wharehouse. the mine and the final area. Those are the main areas, the player has to go in order to progress. It also has other secondary areas with hidden items such to reward the players that explore.
The scenic views are collectables that can be found under the form of cameras. When the players interact with it, it move the camera to show the POV of scenic view before giving the control back to the player.
Those can be found at key location, often overlooking the landscape and the focusing on an important parts of the map.
The cave is a dark and claustophobic linear path, filled with gas. This place is completely optional, but if the player decides to venture in, they will be able to find the gas mask as a reward.
The player could also decide to buy the mask instead of exploring.
The conclusion
Entering the open-world
Details
When the player exit the tutorial cave, they cannot see the warehouse from their POV, it is only on their way to the mine that they will stubble across it.
Not only does it create the feeling of discovery and exploration, it also serves the progression. This gives meaning to the area and increase the feeling of reward trough exploration.
Since the elevator to get to the mine needs batteries to power it on, the player may need to go explore the warehouse first if they don’t have any.
The layout of the warehouse is inspired by metroid-vanias. You need to discover the keycard in order to unlock the door. While basic, this area explains how to use keycards and introduce the player further into the gameplay loop for the rest of this level.
The main areas
The Shop
The shop serves a gameplay purpose, but also a world design one. While the player can interact with it to buy tools and ressources, but it is mostly used as a POI to help the player locate themselves. It is placed in the center of the map, on the main path for that exact reason. It’s location also allows it to be the first thing the player comes across when venturing in the wilderness.
The Warehouse
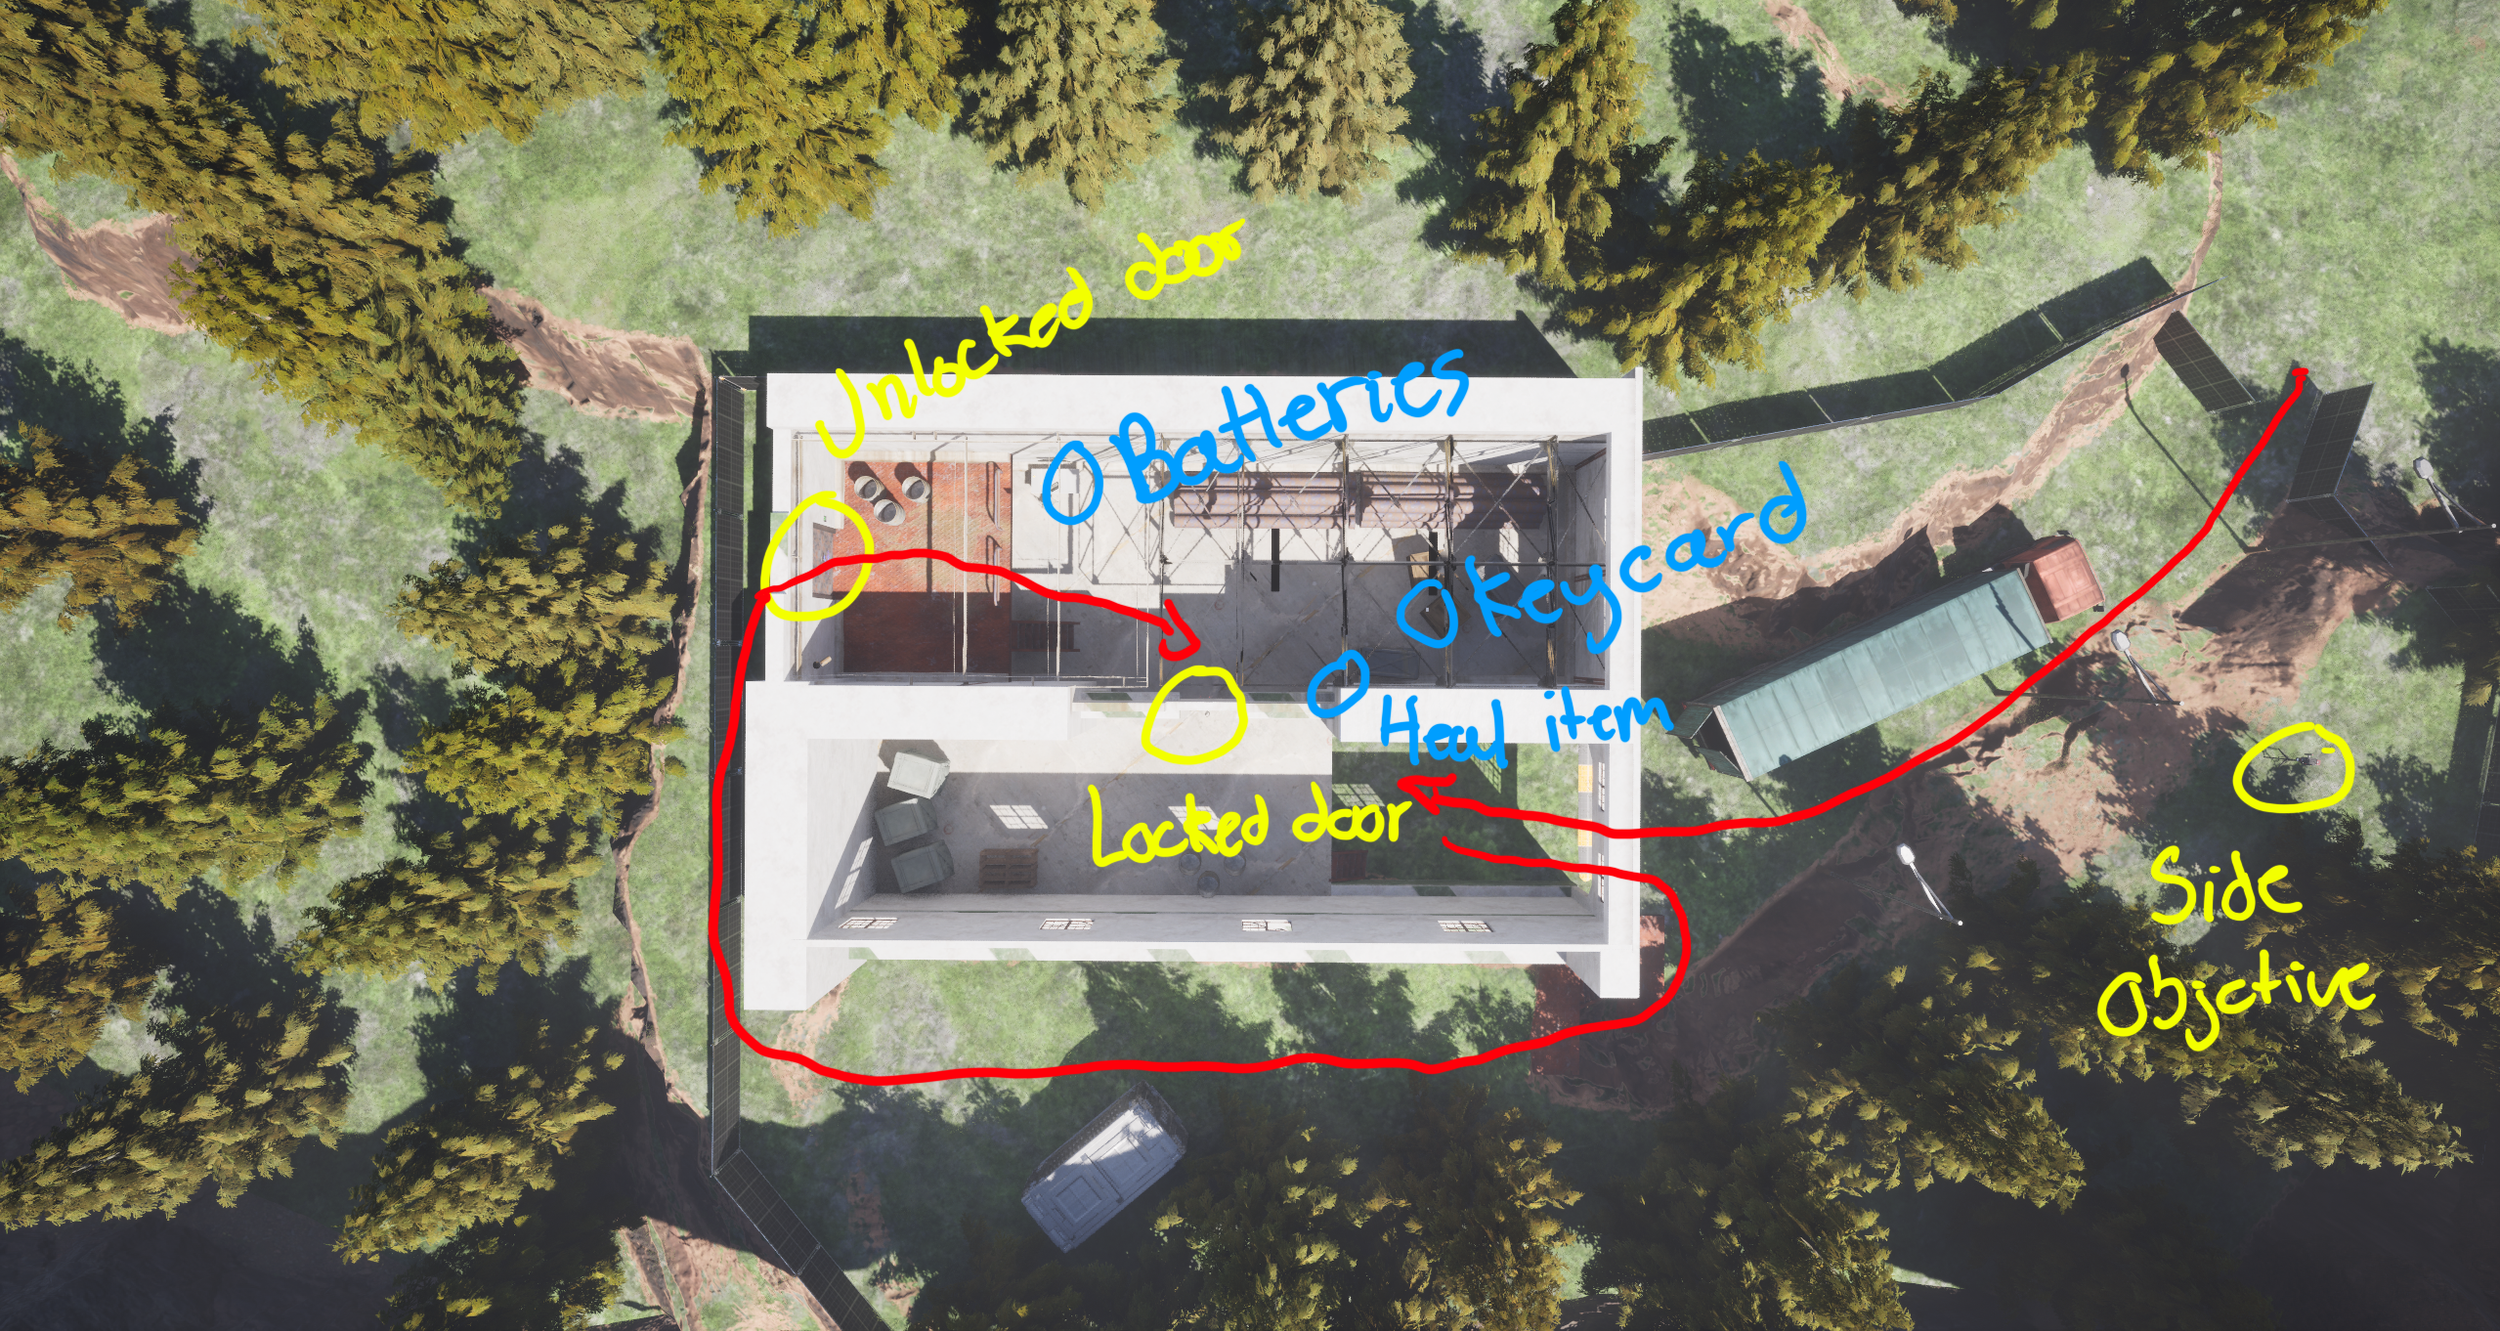
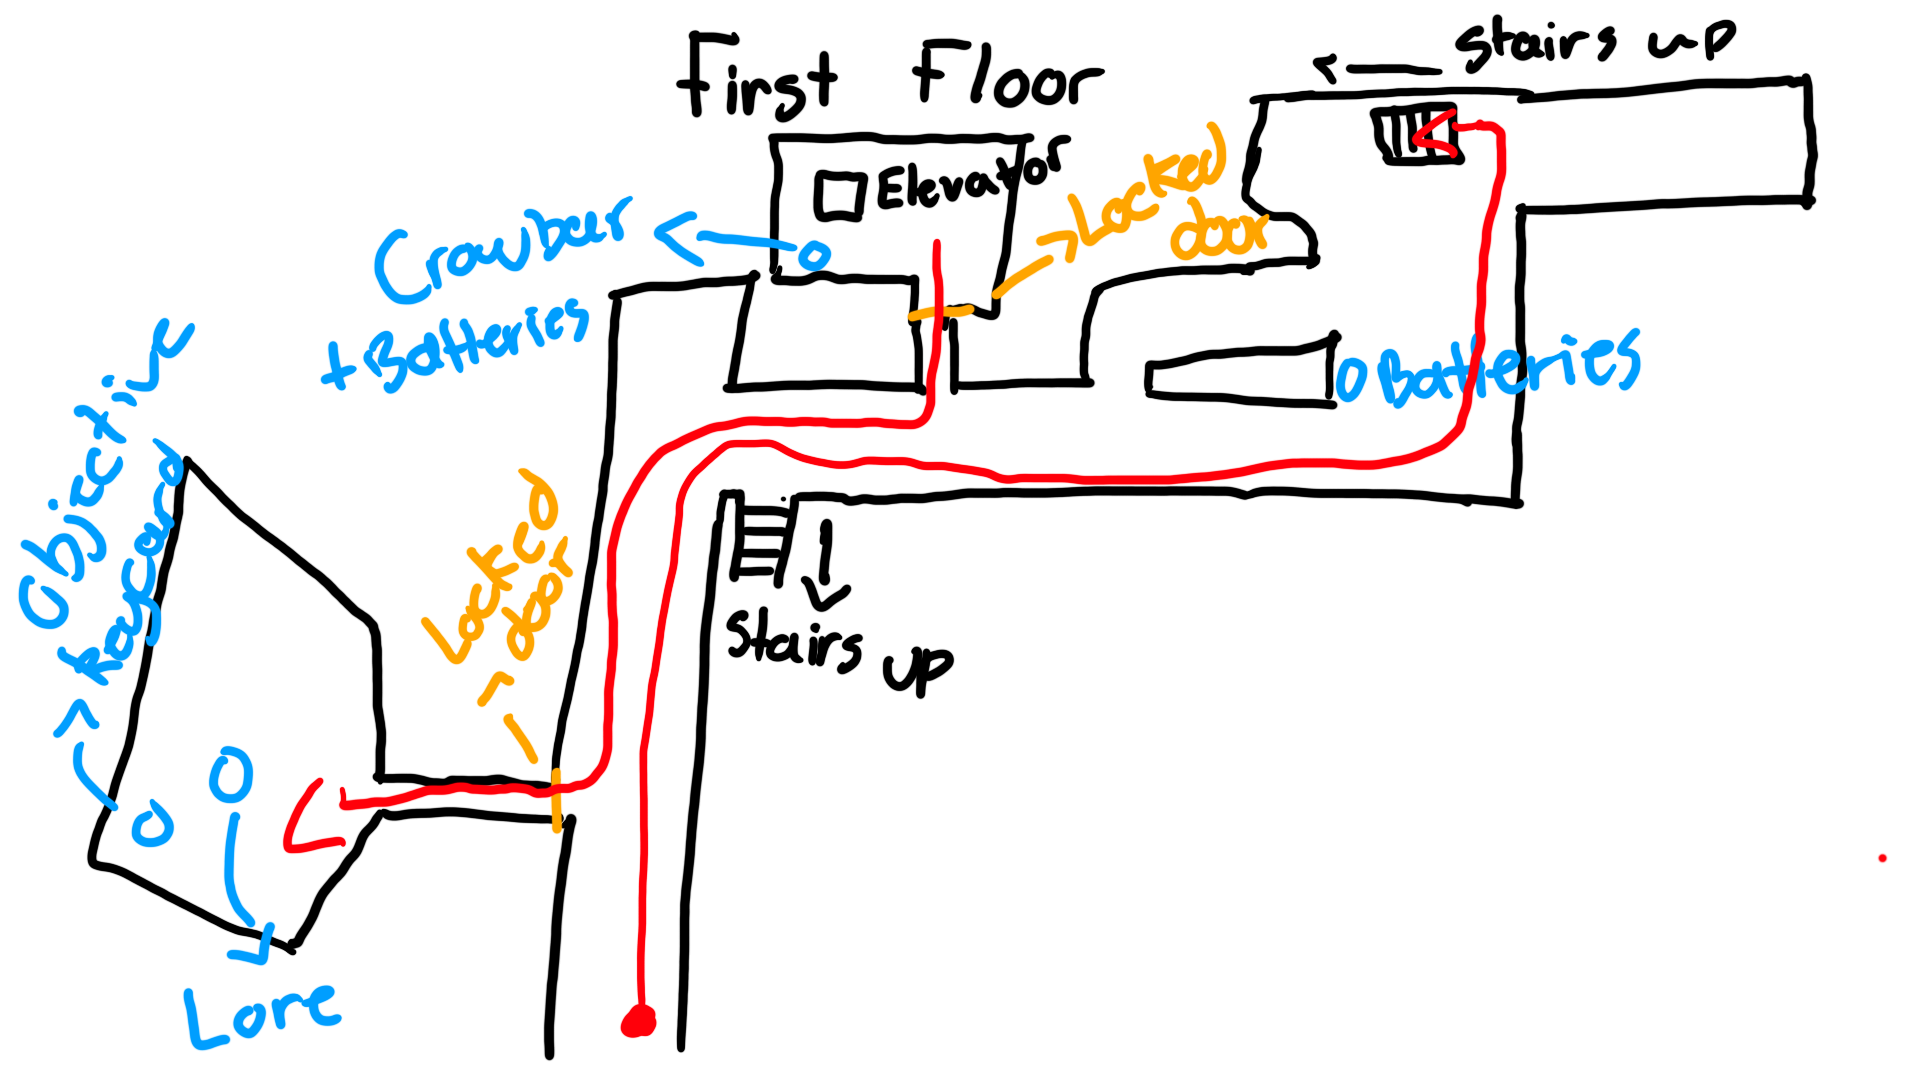
The mine
Details
The goal of this when entering the mine is to reach the room behind the locked door at the entrance of the mine. There are two ways to do it:
Follow the critical path that leads to the crowbar;
Find the keycard for the room
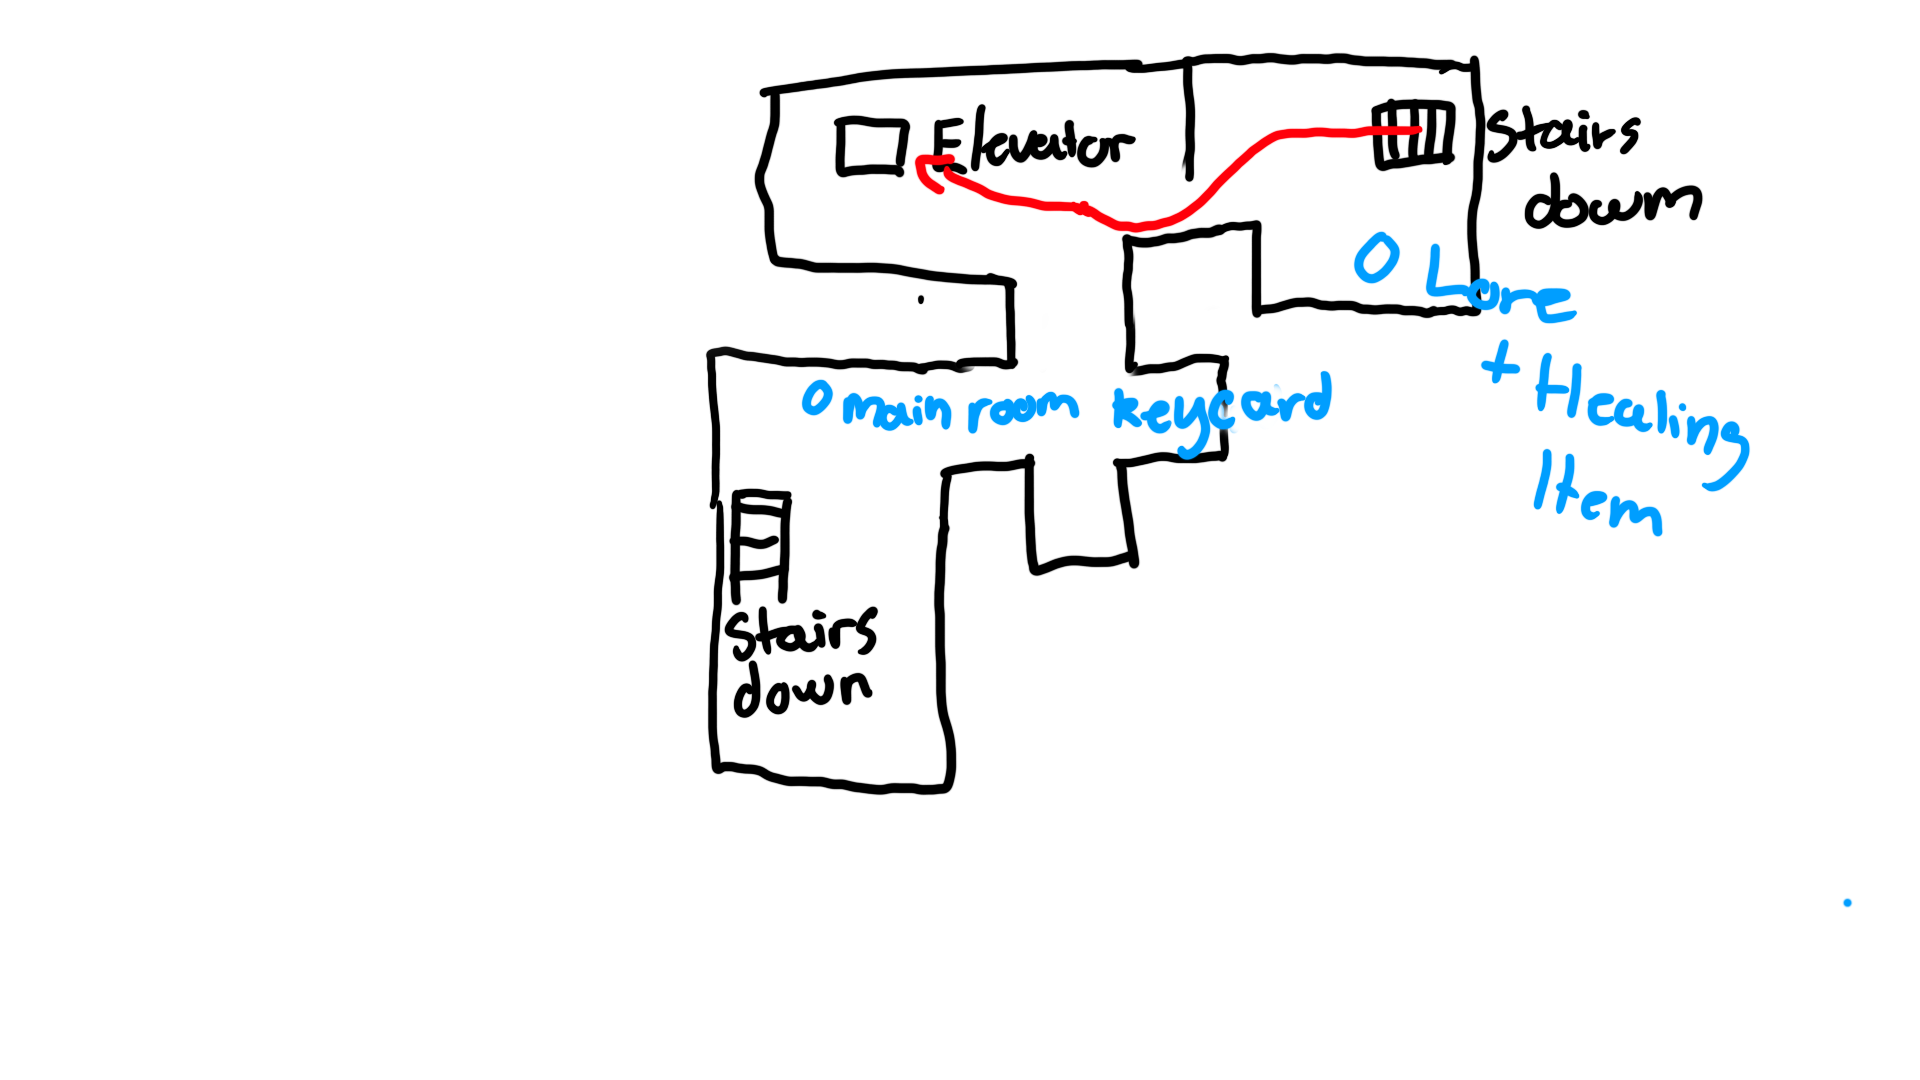
This area allows for a lot of player’s choice, Wherever they go, they will find a way in. I my playtests, most were following the critical path and ended up using the crowbar, but it is also possible to open both locked doors using the key card on the 2nd floor.
This is a very dark and poorly lit area with a claustrophobic and heavy atmosphere. It is then mandatory to use the flashlight in order to see, This is where the battery management comes in place.
I’ve worked hard to make sure the player never ends up with no batteries, but at the same time not giving too much to keep the tension up. Batteries scattered over the area and one pack in the final room, in case they finished them all.
The elevator is broken, when the player steps on it, it falls and they are stuck in the room with the crowbar. They have to use the crowbar they find to unlock the door. This is where player learns they can unlock doors with that tool.
If the player already has the gas mask, this will help them greatly during their exploration of the mine, since there is some gas leak scattered in the area. If they don’t, they need to make sure they use healing.
First floor layout
Second floor layout
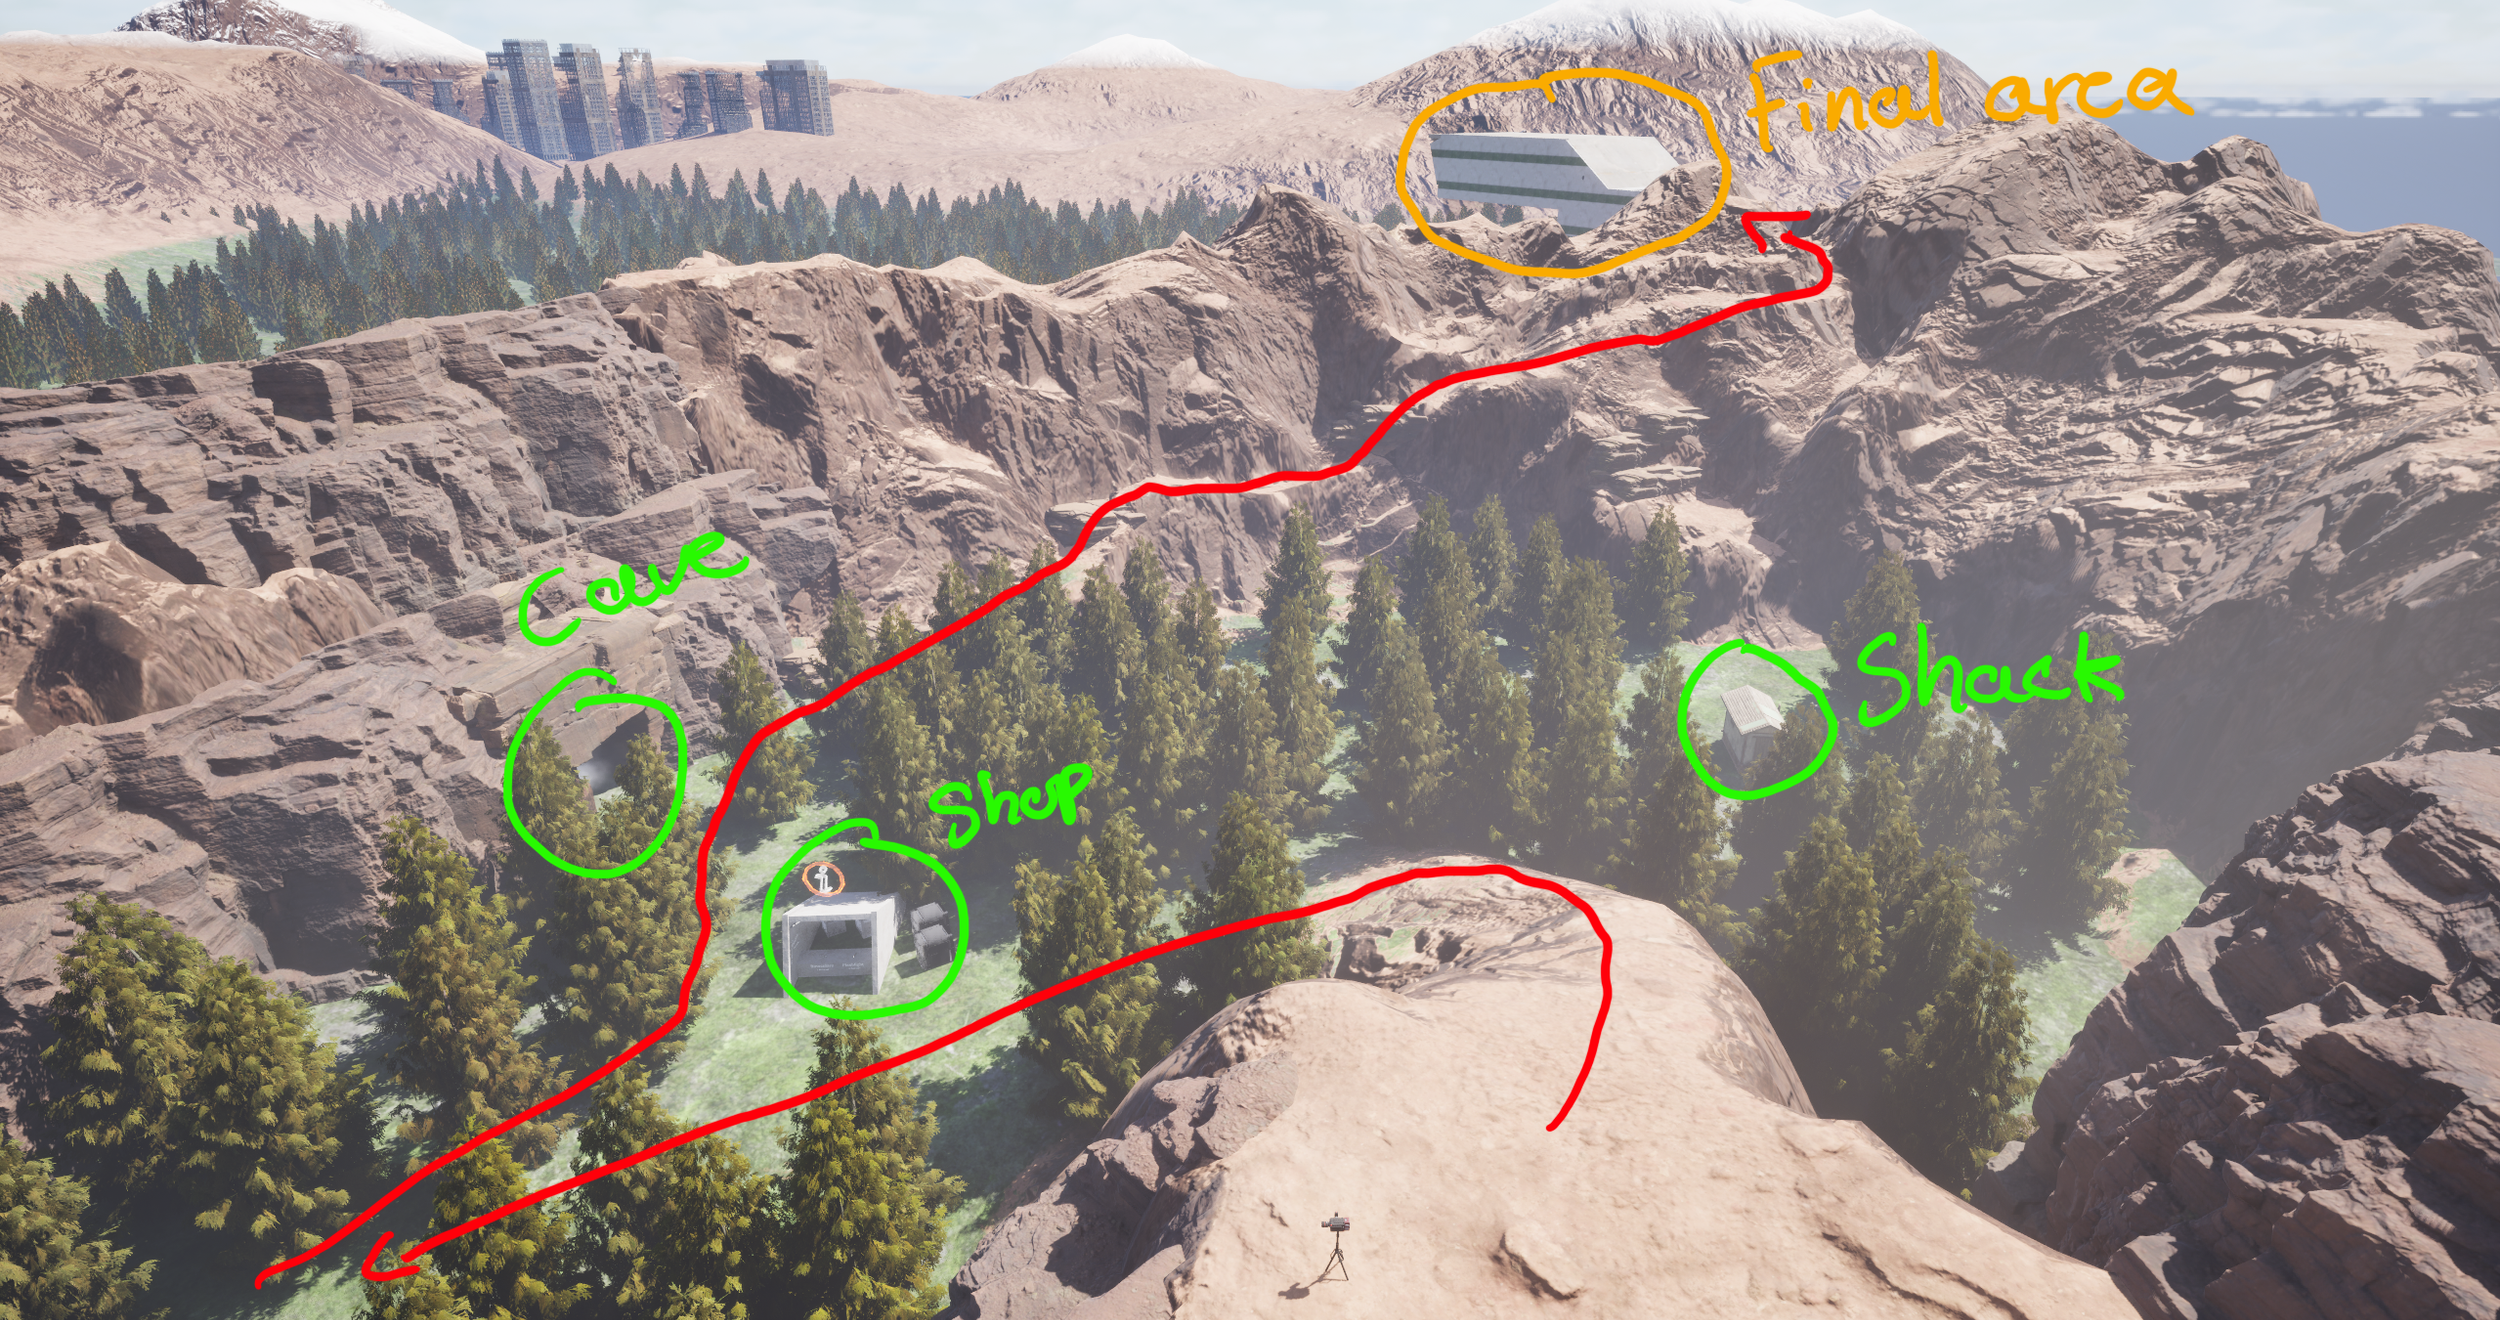
The final area
Details
The final room mostly serves the ending of this project. It looks different then what the player visited as of now. The area feels big and well maintained. The view gives on an abandoned city, winch hints to the player this is only the beginning of something bigger.
To enter the final room, the player must use the three objective keycards they collected during the game.
There is music coming from the radio. When the player interacts with it, it triggers the ending with the credits showing on the window as a hologram.


Secondary objectives and areas
The secondary areas and the scenic views are here to create more engagement from the player. They are scattered around the map at key locations for the player to find. They get rewarded with items or some kind of progression.
Scenic view
The cave
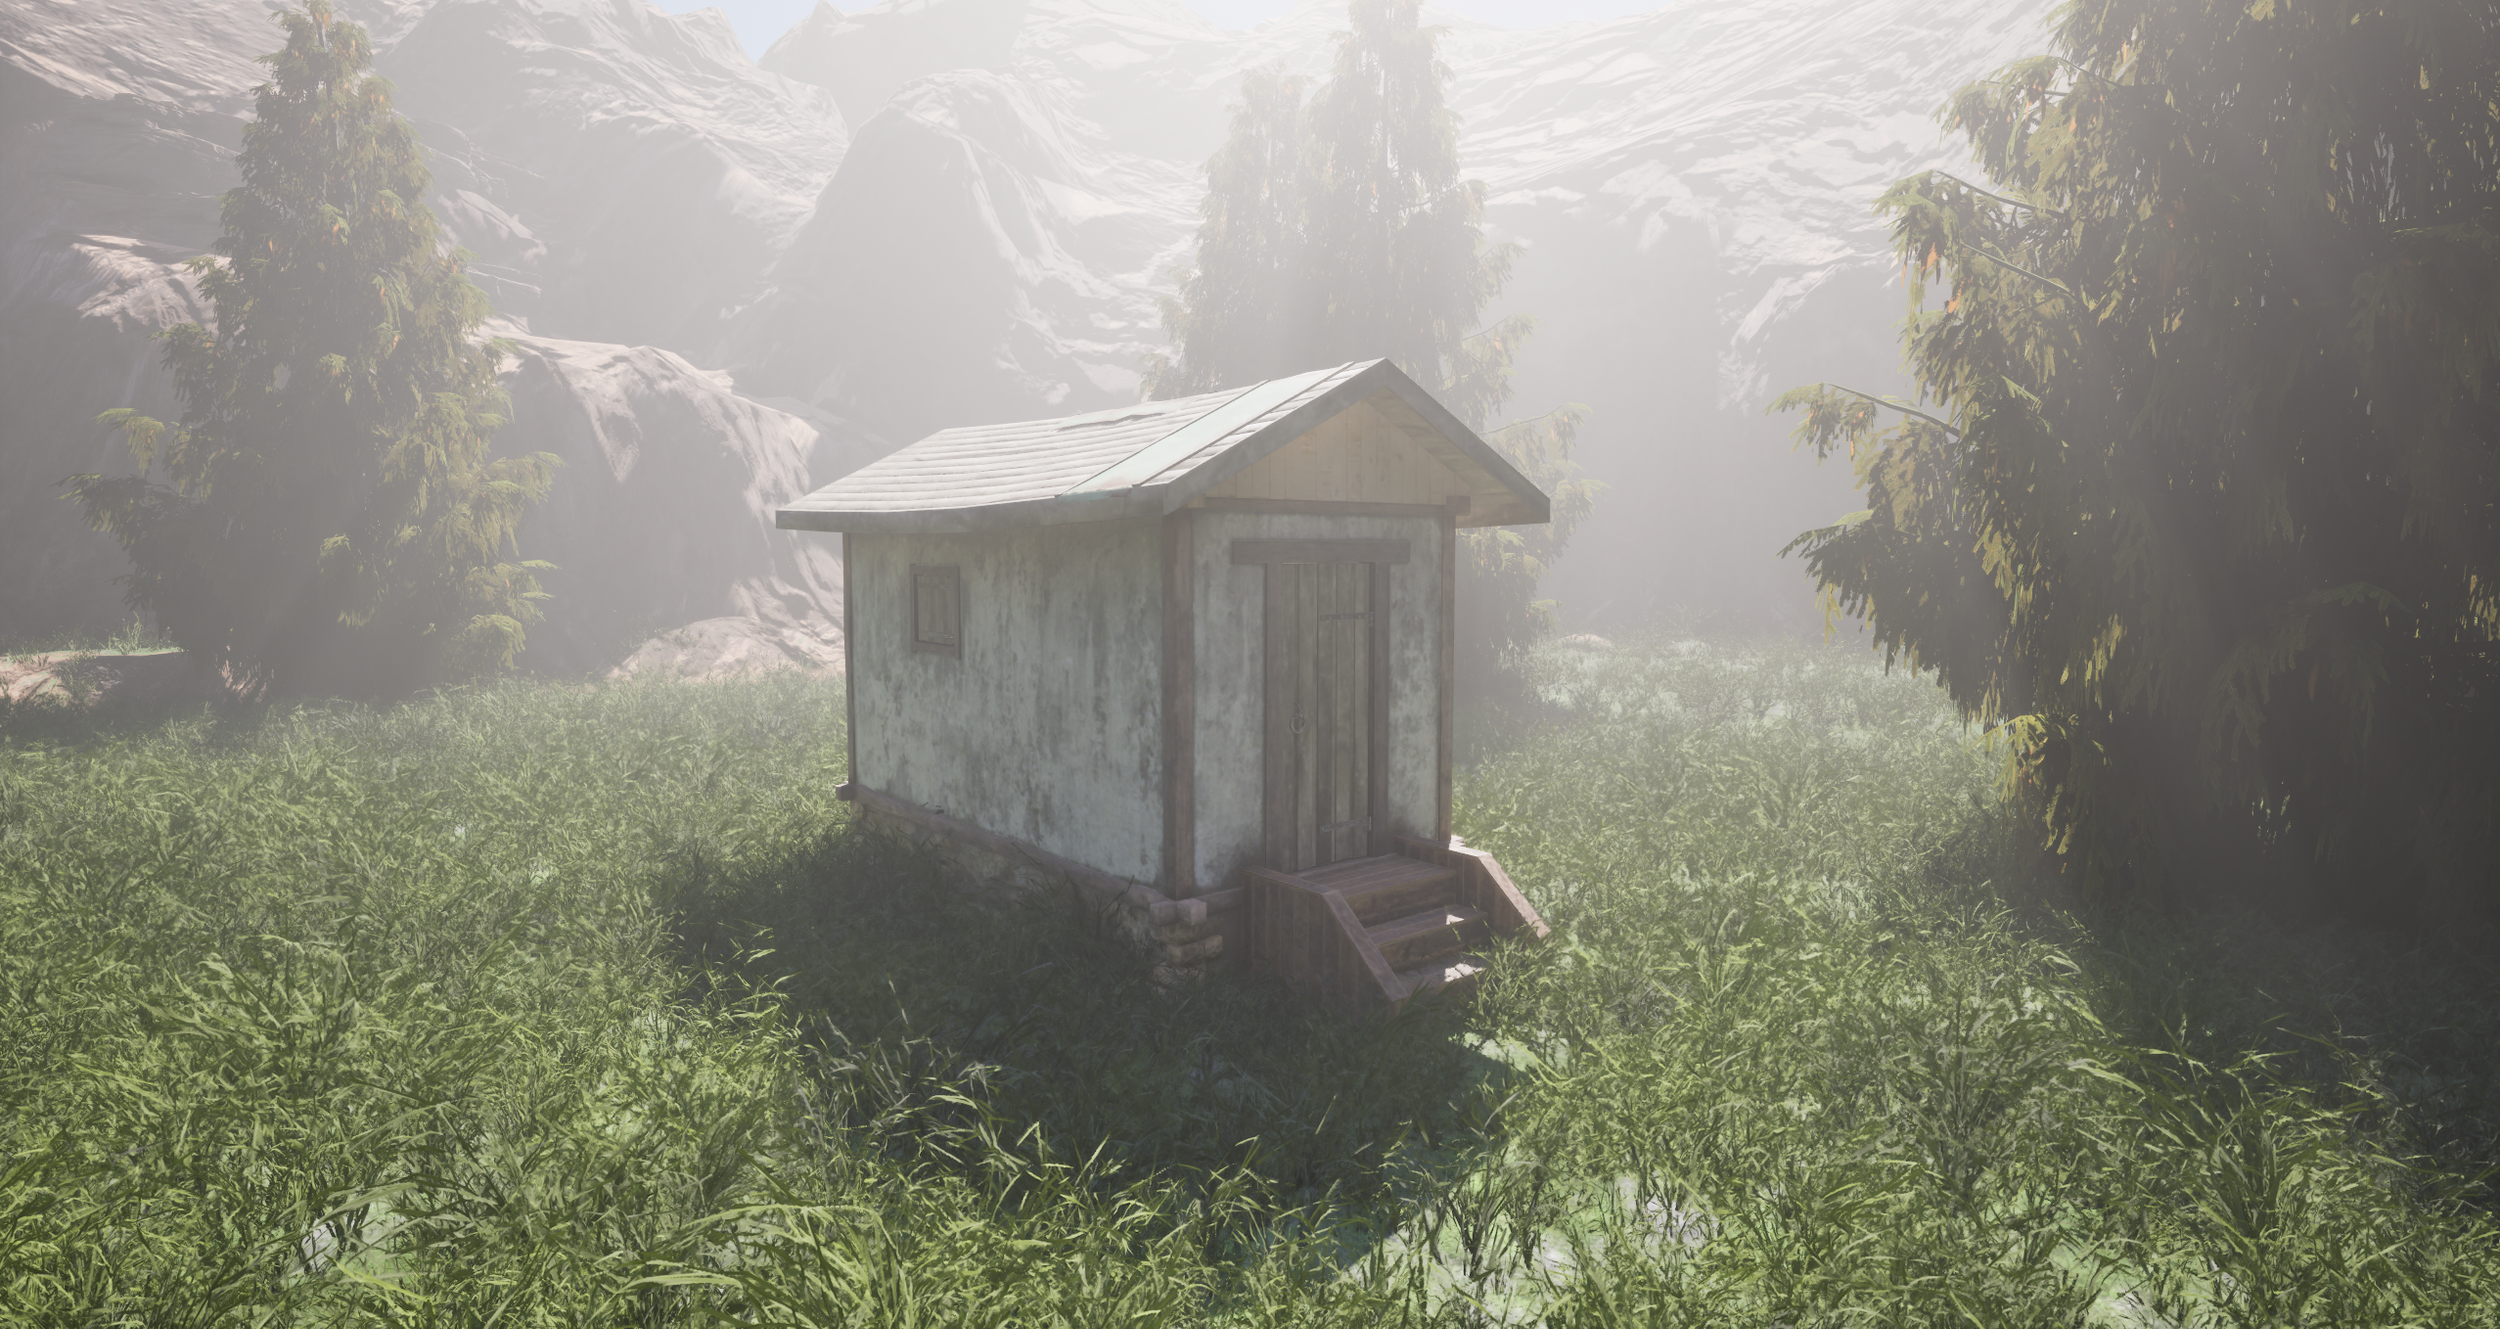
Shacks
There are two shacks that players can come across. They are placed in areas with less attraction to reward players who want to explore.
They store goods such as healing items and batteries for the player to use.

This project is playable from start to finish, with sound, lighting, save points, gameplay mechanics, optimisation, etc. I had to create a project from the ground up and build a world in which I could show off my level design skills. That means that I also made the game design as well as programming, debugging, tech art, sound design, optimisation using world partitions and data layers, playtesting, the UI/UX and more. While I already did work on those aspect in previous projects, it was, usually, on a smaller scale and had a team on whom I could count on to share those tasks with, everyone with their strengths and weaknesses.
Having touched so many elements of a single project by myself allowed me to develop new soft and hard skills about game development, but also improve on what I learned in my previous projects. Deciding to create a more open layout also meant I had to adapt and think outside the box to make sure I delivered a project that would live up to my own expectation. Of course, like in any project, many aspect of the game and ideas had to be scoped down or out right cancelled to make sure I had enough time to work on the main focus of this project and what I like most, the level design.

Tools and assets
Creation tools:
Photoshop
Substance Painter
Engine: Unreal Engine 5.5.4
Asset Packs:
Productivity tools:
Perforce (P4v)
Miro
Trello